
Heya Reader's i hope you are enjoying my posts and blogger templates.
Today i have a new Night Life Blogger Template excellently parsed and with a neat header image.
>>>>>>>>>>>>>>DEMO<<<<<<<<<<<<<<<
>>>>>>>>>>>>DOWNLOAD IT<<<<<<<<<<<<<<<<
Just Copy Paste it in your edit template in html region.
Cheers,
Enjoy
Thursday, October 30, 2008
Night Life Blogger Template
Friday, October 17, 2008
Digg This Story Language Translation Flags and Script
This tutorial explains how you can add a script to allow readers to view your English site in other foreign languages. As you can see on the right of this page, a reader needs only to click the relevant country flag to read this site contents in his preferred language.
English is not the most popular language in the world. In fact, according to many reports, the Chinese language (Mandarin) is certainly the most widely spoken language. In the internet community, the other popular language platforms are arguably Spanish, Russian, Arabic, Portuguese, Malay, Italian, French, Japanese, and Korean.
Translation from English to other languages
If you have a blog written in English, it therefore makes much sense to be able to reach out to the non-English speaking population as well. There are several online translation tools, the popular free tools being AltaVista's Babel Fish translation and Google's Language Translator. WorldLingo is no longer a recommended tool, as the website translator has a translation limit of 500 words, beyond which you have to pay a monthly fee for their service.
For this site, I have used the Google Language Translator. Google is able to translate English website contents into Arabic, Chinese, French, German, Italian, Japanese, Korean, Portuguese, Russian, and Spanish. The JavaScript used here can be applied to most of the blogging sites like Blogspot, Typepad and Wordpress. Copy the following script and paste it at the part of the template where you want your language translator to appear.
Points to note:-
1. For those using Blogspot, once you have logged into your Dashboard, go to Template-> Page Elements. Add a “Page Element” and select “HTML/JavaScript”.
2. Copy the above JavaScript. Under the “value” (in red), you will see the URL of this website. Please change that to the URL of your own website. Save and refresh the page.
3. If you want a slightly bigger flag, you can increase the width of the images, for example, from “30” to “36” and the height from “20” to “24”.
4. Should you come across a translation that doesn't look right, you can always suggest to Google a better translation to help them improve their translation quality.
Translation from other languages to English
If you have a site written in another language, you can also have a translation tool on your Blog to translate it into English. At the moment, Google is able to translate Arabic, Chinese, French, German, Italian, Japanese, Korean, Portuguese, Russian, and Spanish sites into English.
Go to the official Google Language Tools site. Key in your Blog URL at the place circled in the picture below. Choose the languages e.g., “Italian to English”.
Language Translation Flags and Script
Once you click “Translate”, you will be taken to the translated page. Copy the translated page URL in the browser. We have to insert this URL into the HTML code.
Language Translation Flags and Script
Next, login to your Dashboard, under Template -> Page Elements -> Add a Page Element, choose HTML/JavaScript at the place where you want to put your translation flag.
If you want a United Kingdom flag, copy and paste this code into the page element.

If you want a United States of America flag, use this code instead.

Please remember to insert the translated page URL into the code. If you wish to resize the picture by specifying the width and height, or if you want to have readers go to a new window when they click the link, you may read the article on Hyperlinks and Image Links (II) to see how you can do that.
Save and refresh your Blog to see the translation flag.
Tuesday, October 7, 2008
How To Change Blogger Template
Hey Guys i know many are facing problems while changing their template and also few donot know how to change their blogger templates.
Download then unzip the template file.
NEXT:
1. Upload the image(s) to your image hosting account (Flickr, fotopic.net. Or photobucket.com - recommended).
2. Open the template text file (.txt) in Notepad, UltraEdit, or another text editor.
3. Looking through the text file, replace: http://your_image_url_here/ --> with your own image URL (see no. 1)
4. Login to blogger.com.
5. Select change setting - Template - Edit Current.
6. Delete all of code in the box, replace with all of code from the template file.
7. Click 'Preview' to make sure the layout.
8. If everything looks okay, click 'Save Templates Changes'.
9. Don't forget to click 'Republish' after saving the template.
To see the changes, refresh your browser (press F5 or Ctrl-F5)NOTE:
You're free to add your own accesories to the template code. Example:
You can put your shoutbox code HERE, in this line!
Solving The bX-994eaq & bX-ru6d8m Errors
For your information, this is not an official bypass procedure, nor a hack. I merely chanced to get lucky and somehow managed to bypass the error codes. I know it could get very frustrating getting the same error repeatedly. Trust me, I've faced that a lot of times, and it's why I'm writing this post, hoping you just might get lucky too. The good news is I'm always lucky and so are others who've read this post, at least I've never received bad news (lol).
This is what you do when you receive the bX-994eaq and bX-ru6d8m errors while trying to upload your new blogger template:
[Go to Layout>Edit HTML and download your entire template using the Download Full Template (this is necessary if you want to revert back to your current template).]
Go to Layout>Page Elements and back up all the HTML codes of your widgets to your computer using notepad (you don't want to start all over again).
Remove (delete) the widgets/page elements one by one (manually). Even if you can't remove all the widgets, try removing as much widgets as you can.
(Note: The trick to solving these errors is in manually deleting the widgets.)
Go to Layout>Edit HTML and upload your new template using the upload button.
If there are widgets that have yet to be deleted, confirm the deletion.
If the upload is still unsuccessful, you might want to go to Layout>Pick New Template and choose one of the pre-uploaded blogger templates randomly and save your template. After this, repeat the above steps again.
This is all I know so far as the two error codes are concerned. Believe me, I've changed my templates like a hundred times and have come across these errors many times. I'm not an expert, but I'm persistent. I found out this solution through hit and trial. If it didn't work for you, I'm sorry. If it worked, you're in luck.
As a matter of fact, Blogger does not specify any solution to the errors in question. I'd done a lot of search on the codes and the nearest I came to actually solving them was when I read a blog-post written by an experienced blogger, who alleged that there is a way to bypass the errors, but of which he/she was not supposed to talk about and then went on to bullshit about how best one could report the error to Blogger.
I've got several positive comments on this and am really glad I could be of help. All the best!
Monday, October 6, 2008
Creative Art Template For Blogger

Hey guys check out this wonderful Creative Art Template a one of the kind template with nwe weblayouts.
Optimization
Download the txt file and upload it our blog, to edit navigation menu find this code div class=’Menu’ , and edit the links below div class=’Menu’ code. Since i’m not a flickr users i do not know to edit flickr section but you can find out how to put flickr album to blogs on the internet.
I have made this template into a txt file so that u can just copy and paste in your blog edit in html region since many are facing problems from blogger uploading the template.
>>>>>>PREVIEW THIS TEMPLATE<<<<<<<<<<
>>>>>>>>>>DOWNLOAD IT<<<<<<<<<<<<<<<
Sunday, October 5, 2008
How To Add Picture Banner To Blogspot Blog
As you all know blogger is fast developing and including many new features day by day and also maintaining all its features. One of the latest feature of Blogger is the Header image editing feature. Ising this new feature, the image appears in the center, as a background to the title. For more control of your blog and the position of the picture like picture appear on the left or on the right of the title, it may be better to follow this guide.
This guide is about adding an image or picture to your Blogger Header to replace the Header Title, and to add a unique personal touch to your Blog. At the same time, we would like to have a clickable Blogger Header so that anybody clicking on it will be brought directly to your Blog's home page. For purposes of search engine optimization (SEO), we would include a text in the code so that the title of your Blog can still be read by search engine spiders despite your removing the Header text.
Before we begin, if your intention is simply to add a background picture to the Header, but still retaining the Header text and description, please refer to my other article on “Background image for Blogger Header”
Next, you will have to enable additional Page Elements to your Header section. When you log in to your dashboard, and go to Template -> Page Elements, you should see an option for you to add a Page Element above your Header.
Add picture without link to Home page
This is simple. If all you want is to have an additional picture or image above or below your Header text, click the “Add a Page Element” link and select “Picture” to upload the image from your computer. Save and refresh.
Add picture with link to Home page
Instead of uploading the picture, you will need to create a link. To do this, you need to have the picture uploaded somewhere
Monday, September 15, 2008
Google Chrome Blogger Template

Author of ZonaChrome.com , a blog about Google Chrome , has converted the template of Ericulous.com which is Google Chrome , i did not like the template but since affection varies from person to person i decided to share this blogger template with you . The template doesnt have as many graphic layouts and which anyone would like but all in all this is the official Google Chrome template
Features of Google Chrome Blogger Template
* 2 columns fixed width
* Widgets ready
* Gravatar ready
* Works on Wordpress v2.5 and above
* Tested on IE6/7, Firefox, Opera, Safari, and of course Chrome
* XHTML & CSS Validated
Enjoy your free blogger template
>>>>>DOWNLOAD NOW<<<<<<
Thursday, July 10, 2008
Dilectio Blogger Template

Here’s a nice three column modern artistic Blogger template with some nice bells and whistles. It has a cool search box and “About You” section with a red/orange background along with a custom date/time stamp for each post. This template is only the second one ever to include javascript tabs within the sidebar. That means instead of the page reloading each time you click on a tab, it dynamically clicks over! Check out the live demo to see it in action.
This free Blogger template is also setup for you to easily add Google AdSense and make money from your blog. If you don’t already have Google AdSense, you should read more about how to make money from Blogger and sign-up. The ad format and colors you should use to best match this template are illustrated below. The 300 x 250 rectangle with #fff3e2 for the border and background, #cc0000 for the text, and #856d65 for the title and url. This will make your ad block blend in nicely with the light pink second column.
You’ll also need to setup the header tabs before they appear. Just edit the “top tabs” widget and create the tabs you want. The “Home” tab automatically appears once you create your first tab.
This template was originally designed by Design Disease for WordPress and was converted into Blogger by Blog and Web. eBlog Templates decided to take it one step further and enhance it to include the dynamic header tabs and javascript recent posts and comments tab section.
>>>>>>>>>DOWNLOAD NOW<<<<<<<<<<
Saturday, May 31, 2008
Tuesday, April 29, 2008
Blogging Pro Template

If you’re looking for a great make money online Blogger template then I’ve got news for you. Blogging Pro is the latest and greatest web 2.0 template built just for that. This is another exciting cutting-edge Blogger template that we’re giving away for free and all we ask of you is to keep the footer links intact.
You might see some other conversions of this template out there but I promise you’ll find ours to be top-notch and feature-rich. Check out our live Blogging Pro for Blogger demo to see and interact with the template before you even download it!
This template was originally designed for WordPress by Design Disease and converted to WordPress by Blogging Pro. We loved this template but were disappointed we couldn’t find a good conversion for Blogger users so guess what? We converted it to Blogger ourselves!
It’s a rounded corners, web 2.0, three column, orange and shaded blue beauty with some great features and widgets you’d normally only find with a WordPress theme. Here’s a list of what’s included:
- Dynamic header tab creation
- Prime location AdSense header ad space
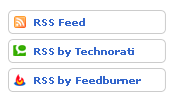
- Multiple rss feed subscription options ready to go (Blogger rss, Technorati, and Feedburner)
- Custom individual post date display
- Addthis bookmark and sharing individual post widget
- FEEDJIT live traffic feed widget
- Custom comments image display
- Three column footer with your recent posts, recent comments, and recommended money maker links
- Clean and organized template layout editor screen
You can see from this screenshot that the actual editor is nicely setup so you don’t need to scroll or try and figure out how to click on the “edit” widget links. Most templates that you download make it tough to edit — not this one!
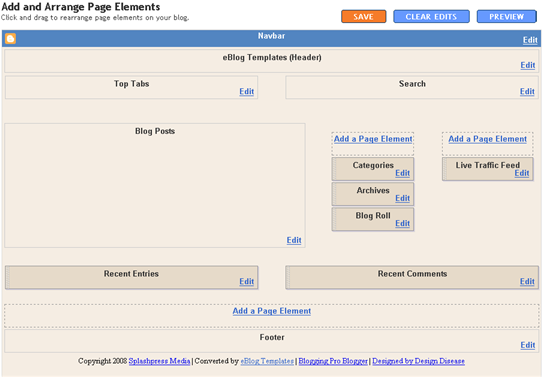
Now before you can get fully up and running with this new Blogger template, you’ll need to properly set things up. Please follow the steps below and read items carefully. The same questions are usually asked over and over by people posting comments, yet the answers are usually right in front of them. This is especially true for why the post date might not be working on your blog.Let’s start from the top of the template and work our way down each item. Don’t be too surprised when the template doesn’t look like the screenshot when you first load it up. You’ve got some configuring to do first! ![]()
Top Tabs Setup
This is actually pretty easy since the top tabs are a link list. You don’t need to alter the template code. Just go into your Blogger page layout and click on the “edit” of the “top tabs” widget. Start adding new links and then save. A “home” link will automatically appear once you setup this widget so you won’t need to add one. Save and refresh your blog to see the pretty new tabs you just created. Here’s what it should look like (different names of course)
![]()
Configure The Three Header RSS Links
This section is actually setup to dynamically work except for the Feedburner link. You’ll first need to have a FeedBurner account.
Once you’ve got your FeedBurner account, you’ll need to edit this template code and replace a few parts. Search your template code for the following text: YOUR-FEED-NAME-HERE . Replace the text with your FeedBurner name (i.e. eBlogTemplates is ours)
After you’ve changed this link save your template and check to see if it works. If you’re having trouble finding your feed name or id, please read our article above or see FeedBurner’s help section to locate it.
Header AdSense Setup
This is a great location for showing ads and we really like how the designer laid everything out. The default ads are just a placeholder but of course feel free to use them until you find a replacement. You’ll need to again edit the template code to swap out the ads. Search your template for
and right below that is where you’ll find the ad code block.
>>>>>>>>>>DOWNLOAD NOW<<<<<<<<<<<

Individual Post Date Setup
This is a very important step and one that most people think is broken when they install the template. It’s not folks. You just need to go into your Blogger settings and make a small change before it will work.
After you install the Blogging Pro template, go to your Blogger’s “Settings” => “Formatting” and look for “Timestamp Format”. Make sure you change it to this format: “Tuesday, January 25,2008? as shown below.

This needs to be set in this format otherwise the date won’t show up properly on each of your posts! Actually the date will most likely be blank and you’ll think the template is broken. Remember to change the TIMESTAMP FORMAT (fourth item down on the page) and NOT the Date Header Format option
>>>>>>>>>>DOWNLOAD NOW<<<<<<<<<<<
iTheme Techno Left 2 Column Template
This is another variation of the popular Mac OS interface design which includes the original really cool drag & drop sidebar feature. It allows you to rearrange the order of your sidebar in a dynamic fun way (check out the demo and try it yourself). It also includes the FeedIt widget which shows real-time live traffic to your site. This template also comes with a top AdSense link unit which is a great spot to make money with your blog. Make sure you have a Google AdSense account and then you’ll need to modify the template code and replace the AdSense code with your own. This XML template was converted by BlackQuanta and was designed and built by Nick La.
Installation Instructions
>>>>>DOWNLOAD NOW<<<<<
Free iTheme Right 2Column Template

>>>>>>DEMO<<<<<<
The iTheme Of Word Press Converted For Blogger
>>>>>>Dowload Now<<<<<<
Thursday, March 20, 2008
The Dream Light Template
Hey guys the latest Dream Light Theme For blogger xml is here
Check Out This Thumbnail
>>>>>>>>PREVIEW THIS TEMPLATE<<<<<<<<<<<
>>>DOWNLOAD NOW<<<
Wednesday, March 19, 2008
How To Add The Blogger “Read More” Expandable Posts Link
This is a pretty popular Blogger hack that lots of people have asked me about. Instead of answering to each email individually, I thought it would make more sense to write an article about it.
With this hack, you can choose to display a select amount of text from the beginning of each post as a teaser instead of showing the entire post on the front page of your blog. Then when people want to read the rest of the post, they can click a “read more” link to see the full post. This is very handy if you have lots of long articles all on one page. (Note that you’ll need to have post pages enabled in order to make this feature work.)
Step #1 - Update Your Template Code
First you need to edit your existing code so I recommend copying and pasting it into notepad or any text editor. Also, it’s smart at this point to create a backup of your template just in case something goes wrong. Now do a search (CTRL + F) within the text editor for the following code post-header-line-1. This is the default code that Blogger includes but some custom templates remove or change this code so you might have trouble finding it. If you can’t locate this text then try searching for
Add the following code below the
The result should look something like this:

If you don’t have the default

Notice in both examples that the code in yellow and the
Now let’s add one more bit of code which will actually create the “read more” link in your post. This code will go below the
Yes, there are supposed to be two

This code will be the same no matter what template you are using. Just make sure it goes below the
Now let’s look at what the final result should be. Here’s the updated code block you just worked on all put together:

Ok, you’re all done editing the template code. Paste it back into your Blogger html window and save it. If you get an error, you made a mistake. The most common mistake is to accidentally delete a > or <> “Formatting” and scroll all the way down to the bottom. It’s the last option called “Post Template”. You’re going to paste in the following code:
You’ll want to keep the spaces in there which will make sense later. After you save this, it will look like this:

Step #3 - Create a New Post
Ok, we’ve got everything all setup so it’s time to go and test it out. Hopefully you’ve got a new post in mind for your blog. If not, then we’ll just create a test post which you can later delete. When you click on the “Posting” tab, you’ll notice that the post text area is now pre-populated with the
So when writing your new post, anything you put above the tag will be the teaser text. The main body of your post needs to go in between the and tags in order for the “read more…” link to work properly. See the screenshot below. Sometimes pictures illustrate better than words.

Now publish or preview your post to see the “read more” hack working on your blog. If it doesn’t show up for some reason, go back and run through the steps again. Most likely you pasted the code blocks in the wrong places. It’s difficult to troubleshoot these issues since each template can be unique so please make sure to double-check your template before asking for help in the comments section below.
Here’s the live post with the “read more…” link properly working based on the text I used above in the post text area.

Additional Info
If you want to go back and update your old posts with this new “read more…” feature you can. Just go back and edit each post manually. Essentially you’ll need to paste in the
For some posts, you might not want to use this feature at all. If that’s the case, just delete the
How to Setup Your Recent Posts and Recent Comments Blogger Page Elements
In order to enable the Recent Posts and Recent Comments page elements in your recently downloaded Blogger template, you need to follow a couple simple steps.
These lists aren’t going to show up when you first install the template so we’re going to bring them to life now. They are actually both RSS Feed widgets so we’ll need to paste in your feed and comment rss feeds to make them work.
Let’s start with the Recent Posts page element so click to edit it. Then paste in your RSS feed url which will most likely be in this format http://YOURSITE.blogspot.com/feeds/posts/default . Make sure to replace “YOURSITE” with your actual blog url.
There’s no need to change the title (unless you want to call it something else) so then hit “Save Changes”. Then save your blogger layout and go over to your other browser window, refresh and see the Recent Posts appear in your blog’s sidebar.
Now you’re going to do the exact same thing with the “Recent Comments” page element but you’ll instead use this feed format http://YOURSITE.blogspot.com/feeds/comments/default . Again, make sure to replace “YOURSITE” with your actual blog url. Save and make sure it’s working properly. If it doesn’t appear on your blog, chances are you don’t have the correct feed url or you might not have any comments yet.
If you really want to fine tune your Recent Posts and Comments settings like increasing the max number displayed to 10 you can. Go read our advanced recent posts settings article and take your widgets to another level.
Friday, March 14, 2008


Flowery

Download this flowery single column blogger xml template this is a freexmltemplates exclusive template
>>>DOWNLOAD NOW<<<
Subscribe to:
Posts (Atom)


Top Stories Blog Directory Submission
